
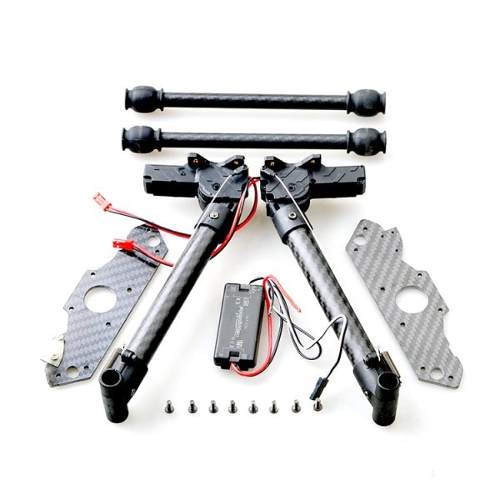
Here the story, some days ago i buy a retractable DJI landing gear… i thought it will be fit for my freeX Drone.


With some small modification here and there the landing gear fit for my FreeX But i have some problem with it…
FreeX Skyview drone stock Radio transmitter have only 7CH, since i use Gimbal for my GoPro than i have use all the channel.
than how i can control my gear up and down?
The answer is, i use Arduino Pro Mini to generate extra channel from existing channel i have… and this is how to do it…
- Open your freeX upper fuselage, be careful with GPS cable attach on it.
- Look for Radio Receiver

- Parallel and soldering a socket pin to the Signal pin on CH6 (Signal pin is the first pin row from the top)

- CH 6 is for headless / Altitude flying control

- Using Socket cable, connect the GDN and Vcc from arduino pro mini to the GDN and Vcc of the receiver (second and third pin row ) for powering the arduino pro mini board

- for input/output you can use any pin from 0 to 13, but in my case i use pin 5 for input and pin 8 for output
- Connect Arduino pin 5 (input) to the parallel pin you have make before, this pin function as listener from CH6.
- Look for gear controller (a black box include in the retractable gear package), there’s black and red cable for the power from the battery

- Still at the same box, Connect Arduino pin 8 (output) to the Signal input on the gear controller (White cable)
- connect 2 socket from the gear to the side pin of the box (be careful with + and – pin)
- Now the programming part… (klik + sign below)
Click to expand the code –> FreeXgear.ino
int loop1;int press1;int press2;int gear;
int timeout;
void setup() {
pinMode(13, OUTPUT);//set LED pin for visual indicator
pinMode(5, INPUT); // Set our input pins as such
pinMode(8, OUTPUT);// set pin for output signal
Serial.begin(9600); // Pour a bowl of Serial
loop1=0;press1=0;press2=0;gear=0;
timeout=30;
}
void loop() {
ch5 = pulseIn(5, HIGH, 25000); // Read the pulse width of pin 5
if (loop1<timeout) {
loop1=loop1+1;
} else {
press1=0;
press2=0;
}
if (ch5 < 1000) {
press1=press2+1;
loop1=0;
}else {
press2=press1;
}
// start ext ch w/ 2 loop
if (press2==2 && press1==2 && loop1==timeout) {
digitalWrite(13, LOW);
for (int i=0; i <= 10; i++){
digitalWrite(8, HIGH); // turn the LED on (HIGH is the voltage level)
delay(10); // wait for a second
digitalWrite(8, LOW); // turn the LED on (HIGH is the voltage level)
delay(10);
}
delay(10);
digitalWrite(13, HIGH);
for (int i=0; i <= 10; i++){
digitalWrite(8, HIGH); // turn the LED on (HIGH is the voltage level)
delay(1); // wait for a second
digitalWrite(8, LOW); // turn the LED on (HIGH is the voltage level)
delay(1);
}
press1=0;
press2=0;
}
if (loop1==timeout) {
press1=0;
press2=0;
}
// end ext ch w/ 2 loop
delay(10);
}
And this is the result
and my backpack modification…