

If you want to have nice plastic canopy for your drone or other RC, usually u have to build it using plastic forming or at least heater and some base usually from wood or other hard material…
what if u don’t have any of that, but u want to build it too…
well this is u have to prepare to do that…
Material :
- 0.30mm plastic mica (depend on our need)
- paint (u can use aerosol paint or acrylic paint)
Tools :
- Pepakura Designer http://www.tamasoft.co.jp/pepakura-en/download/index.html
- 3D modeler (u can use 3D model for your design using 3Dmax or else)
- scissor
- permanent marker
- adhesive tape
- cutter knife
- ruler
- soldering iron
Now how to do it…
- Build your canopy using 3D modeler, build it using the real scale of your canopy u want to build and save it as .OBJ file, in this case i’m using 3Dmax to do it and this the result http://www.4shared.com/file/vTOYV5pVce/canopy.html

- Open pepacura and load the .OBJ on it, follow the instruction for no flip etc, then click unfold and don’t forget to change the scale to 1 (it mean it will printed same scale as your 3D model).

- the unfold result will be like this, u can adjust position of the paper as u want… after that print it…

- Assemble all the printed paper as one and place on flat surface
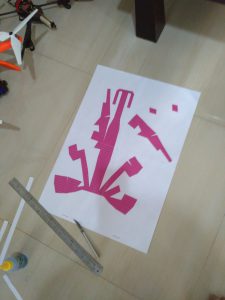
- Prepare your 0.30mm mica hard plastic and place on top of the pattern, and secure it with adhesive tape on the corner.
- Mark every corner of the pastern using permanent marker so u not wrong in cut it later.
- After that cut it using cutter knife and scissor, (Tips: scratch with cutting knife but don’t cut it on every folding line so u will have nice clean fold on every fold)

- after u cut just like pastern now u can fold and stick the plastic on the place, and u don’t have to use glue on it. just soldering iron.
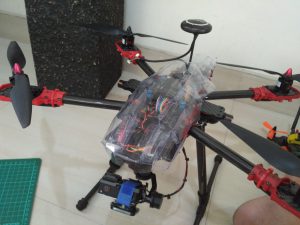
- Now u have complete form of u’r canopy…

- Than u can paint it as u like…


- Have a nice try…